前情提要
驗證的部分其實是第一次聽到&使用 Yup (以前就是徒手寫XD)
然後表單的部分有用過 Formik、React-hook-form還有Semantic UI (要自己搭配驗證流程)
這篇的重點主要會是在表單及Yup的搭配 會再穿插一點i18n
UI Framework:Semantic UI
Validation:Yup
Multiple Language:i18n
Form Flow:自製
工具介紹
Yup
官網: https://github.com/jquense/yup
使用情境: 在表單送出或表單其他流程需要驗證的時候會使用到
// 使用yarn安裝
yarn add yup
// 或使用npm安裝
npm install -S yup

// 載入所有Yup
import * as Yup from "yup";
Semantic UI
官網: https://react.semantic-ui.com/
使用情境: 表單及其他基本的元件樣式
// 使用yarn安裝
yarn add semantic-ui-css semantic-ui-react
// 或使用npm安裝
npm install semantic-ui-css semantic-ui-react

// 載入基本樣式
import "semantic-ui-css/semantic.min.css";
// 載入元件
import {
  Container,
  Card,
  Modal,
  Form,
  Select,
  Input,
  Label,
  List,
  Button,
  Icon,
  Popup,
} from "semantic-ui-react";
i18n
官網: https://react.i18next.com/
使用情境: 錯誤訊息的多語系mapping
// 使用yarn安裝
yarn add i18next i18next-browser-languagedetector react-i18next
// 或使用npm安裝
npm install i18next i18next-browser-languagedetector react-i18next

// 載入基底i18n
import i18next from "i18next";
// 載入好用的react模組化功能
import { initReactI18next, useTranslation } from "react-i18next";
// 偵測使用者瀏覽器的語言
import LanguageDetector from "i18next-browser-languagedetector";
溝通/操作流程
一開始對於流程的想像是
先想像有一個表單 → 在輸入框裡打一些文字 → 離開輸入框時需要驗證是否必填及格式是否正確 → 不正確的話需要提示錯誤訊息;那如果全部欄位都驗證通過的話會正式送出表單
畫面是這樣

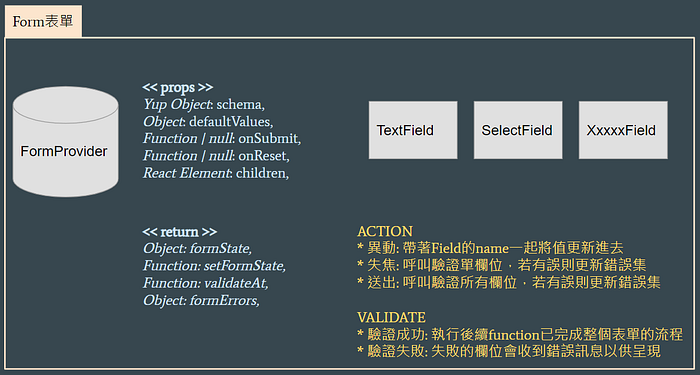
整體畫出來的話是長這樣

開始囉!
實際在寫的時候就會再意識到
嗯~畫面流程有了但應該是會有個集中管理state的地方
那我們再調整一下,整體結構大概會是這樣子
起手式 for Yup & i18n
先定義好多語系相關的資源
file path: /constants/enum.js
import localeCn from "./locales/resources/cn.json";
import localeEn from "./locales/resources/en.json";

export const LANGUAGES = [
  {
    key: "cn",
    value: localeCn,
  },
  {
    key: "en",
    value: localeEn,
  },
];
export const DEFAULT_LANGUAGE = "cn";
file path: /locales/resources/en.js 多語系的檔案內容
{
  "validate": {
    "required": "必填",
    "length": {
      "must": {
        "moreThan": "長度必須大於 {{min}}",
        "lessThan": "長度必須小於 {{max}}"
      }
    },
    "invalid": {
      "space": {
        "betweenBeginAndEnd": "前後不能有空白"
      }
    }
  },
	...
}
初始化i18n
file path: /libraries/init.js
import { initReactI18next } from "react-i18next";
import LanguageDetector from "i18next-browser-languagedetector";
import { LANGUAGES, DEFAULT_LANGUAGE } from "../libraries/enum";

i18next
  .use(initReactI18next) // 跟react-i18next綁定
  .use(LanguageDetector) // 使用瀏覽器語言偵測
  .init({
    lng: DEFAULT_LANGUAGE,
    fallbackLng: DEFAULT_LANGUAGE,
    debug: true, // 除錯模式,開啟的話若有遇到缺漏的key會印出來
    resources: LANGUAGES.reduce((accumulate, item) => {
      accumulate[item.key] = { translation: item.value };
      return accumulate;
    }, {}), // 將多語系json資源載入進來
  });
初始化Yup
filepath: /libraries/init.js
import * as Yup from "yup";
import i18next from "i18next";

// 主要是自定義schema驗證錯誤時的回傳值
Yup.setLocale({
  string: {
    min: ({ label, min, originalValue, path, value }) =>
      i18next.t("validate.length.must.moreThan", {
        min,
      }),
    max: ({ label, max, originalValue, path, value }) =>
      i18next.t("validate.length.must.lessThan", {
        max,
      }),
  },
  mixed: {
    required: i18next.t("validate.required"),
  },
});
多語系專案常用到的custom hook
file path: /locales/useLocales.js
import { useTranslation } from "react-i18next";

const useLocales = () => {
  const { t: translate, i18n } = useTranslation();
  return {
    translate, // 取得當前語系的翻譯值
    changeLanguage: (lang) => i18n.changeLanguage(lang), // 更換語系
    currentLanguage: i18n.language, // 當前語系
    languageOptios: i18n.languages, // 可選的語系選項
  };
};
export default useLocales;
管理state、表單的FormProvider
FormProvider的工作大致如下
- 統一管理各欄位的值和錯誤訊息
- 驗證欄位是否有誤
- 處理表單的送出和重置功能
file path: /contexts/form.js
export const ContextForm = createContext({});

const FormProvider = ({
  schema,
  defaultValues,
  onSubmit,
  onReset,
  children,
}) => {
  const [state, setState] = useState(defaultValues);
  const [errors, setErrors] = useState({});
  const handleSubmit = async () => {
    const keys = Object.keys(defaultValues);
    let allErrors = {};
    for (let index = 0; index < keys.length; index++) {
      const name = keys[index];
      try {
        await schema.fields[name].validate(state[name], { abortEarly: false });
      } catch (err) {
        if (err.name === "ValidationError") {
          allErrors[name] = err.errors[0];
        }
      }
    }
    const isAllPassed = Object.keys(allErrors).length === 0;
    await setErrors(allErrors);
    if (isAllPassed && typeof onSubmit === "function") {
      onSubmit(state);
    }
  };
  const handleReset = async () => {
    await setState(defaultValues);
    if (typeof onReset === "function") {
      onReset();
    }
  };
  return (
    <ContextForm.Provider
      value={{
        formState: state,
        setFormState: useCallback(
          (name, value) => {
            setState({
              ...state,
              [name]: value,
            });
          },
          [state]
        ),
        validateAt: async (name) => {
          try {
            await schema.fields[name].validate(state[name], {
              abortEarly: false,
            });
            const newErrors = { ...errors };
            delete newErrors[name];
            setErrors(newErrors);
          } catch (err) {
            if (err.name === "ValidationError") {
              setErrors({ ...errors, [name]: err.errors[0] });
            }
          }
        },
        formErrors: errors,
      }}
    >
      <Form onSubmit={handleSubmit} onReset={handleReset}>
        {children}
      </Form>
    </ContextForm.Provider>
  );
};
export default FormProvider;
來建立表單外殼囉
表單外殼是很重要的地方,主要會涵蓋以下功用
- 定義Yup要驗證的schema內容並給予FormProvider
- 將defaultValues給予FormProvider以供執行重置功能
- 將通過驗證的處理事項傳送給FormProvider以便在表單驗證成功之後接著執行
file path: /sections/form/TodoForm.js
export const TodoForm = ({ isEdit, onClose, onSubmit, ...modalProps }) => {
  const { translate } = useLocales();
  const optionsCategory = useMemo(
    () =>
      OPTIONS_CATEGORY.map((item) => ({
        text: translate(`options.task.category.${item}`),
        value: item,
      })),
    [i18next.language]
  );

  // 需驗證的schema
 const schema = Yup.object({
    title: Yup.string()
      .nullable()
      .default("")
      .max(10)
      .required(translate("validate.required"))
      .noSpace(),
    category: Yup.string()
      .nullable()
      .default("")
      .required(translate("validate.required")),
  });
 // 給予預設值
  const defaultValues = useMemo(() => ({ title: "", category: "" }), []);
 // 如果FormProvider將表單reset值之後,還有其他要做的事情可以寫在這
  const handleReset = () => {
    onClose(); // e.g. 關閉彈窗
  };
 // FormProvider將表單驗證成功後,會接著執行這邊
  const handleSubmit = async (values) => {
    console.log("SUCCESS", values);
  // e.g. 那最新的values去call api
  };
  return (
    <Modal
      onClose={onClose}
      open={modalProps.open}
      dimmer="blurring"
      style={{ width: "auto" }}
    >
      <Modal.Content>
        <FormProvider
          schema={schema}
          defaultValues={defaultValues}
          onSubmit={handleSubmit}
          onReset={handleReset}
        >
          <Card centered>
            <Card.Content extra>
              <TextField name="title" label={translate("field.task.name")} />
              <SelectField
                name="category"
                label={translate("field.task.category")}
                options={optionsCategory}
                placeholder="select category"
              />
            </Card.Content>
            <Card.Content extra textAlign="right">
              <Button.Group>
                <Button type="reset">{translate("button.cancel")}</Button>
                <Button.Or />
                <Button positive type="submit">
                  {translate("button.save")}
                </Button>
              </Button.Group>
            </Card.Content>
          </Card>
        </FormProvider>
      </Modal.Content>
    </Modal>
  );
};
包裝過的表單欄位
使用這邊的元件會有的功效
- 「值」還有「更新值」都統一交由FormProvider處理
- 可以從FormProvider取得錯誤訊息 (如果有的話)
輸入框
file path: /components/form/TextField.js
import PropTypes from "prop-types";
import { useContext } from "react";
import { Form, Input } from "semantic-ui-react";
import { ContextForm } from "../../contexts/form";

const TextField = ({ name, label, ...fieldProps }) => {
  const { formState, setFormState, validateAt, formErrors } =
    useContext(ContextForm);
  return (
    <Form.Field
      control={Input}
      name={name}
      label={label}
      value={formState[name]}
      onChange={(e) => setFormState(name, e.target.value)}
      onBlur={() => validateAt(name)}
      error={
        formErrors.hasOwnProperty(name) && {
          content: formErrors[name],
          pointing: "below",
        }
      }
      {...fieldProps}
    />
  );
};
TextField.prototype = {
  name: PropTypes.string.isRequired,
  label: PropTypes.string,
};
export default TextField;
下拉選單
file path: /components/form/SelectField.js
import PropTypes from "prop-types";
import { useContext } from "react";
import { Form, Select } from "semantic-ui-react";
import { ContextForm } from "../../contexts/form";

const SelectField = ({ name, label, options = [], ...fieldProps }) => {
  const { formState, setFormState, validateAt, formErrors } =
    useContext(ContextForm);
  return (
    <Form.Field
      control={Select}
      name={name}
      label={label}
      options={options}
      value={formState[name]}
      onChange={(_, data) => {
        setFormState(name, data.value);
      }}
      onBlur={() => validateAt(name)}
      error={
        formErrors.hasOwnProperty(name) && {
          content: formErrors[name],
          pointing: "below",
        }
      }
      {...fieldProps}
    />
  );
};
SelectField.prototype = {
  name: PropTypes.string.isRequired,
  label: PropTypes.string,
};
export default SelectField;
以上就是 Yup & Form 的筆記內容,源自於我對這表單驗證流程的想像跟揣測,有任何問題和建議都歡迎互相交流喔!
另外,這邊也有一篇文章是分享了自己寫過的擴充驗證,連結如下👇🏻
https://medium.com/@diuer/useful-validation-of-yup-9df4dfff8b5d


![[手把手教學] 怎麼做上傳 pdf 的 preview功能 w/ Ant Design](https://miro.medium.com/v2/resize:fit:679/1*wsao-6io1SFfxflLxPp3KA.png)


